
Organizations choose Terraform as their cloud infrastructure automation tool primarily for its features, such as idempotency, repeatability, and declarative configuration management, which enable teams to version-control their infrastructure alongside application code.
However, many organizations don’t have the luxury of starting fresh with Terraform. At times, organizations face scenarios in which critical cloud resources have already been provisioned through mechanisms such as the AWS Console, AWS CLI, or third-party tools. As part of their IaC adoption journey, organizations realize they have a hybrid environment in which some resources are outside Terraform management, creating operational complexity and governance gaps.
But how do they manage cloud resources that were already provisioned? They have two options:
Option A: Delete the manually created resources and then redeploy them with Terraform. This solution achieves the objective but has a longer turnaround time because it requires someone to manually navigate to each AWS cloud resource and delete it individually. Then write, deploy, and test the Terraform code to ensure it matches the current resource properties. Sometimes, deleting the cloud resource is not an option because other downstream applications require it.
Option B: Use terraform import to bring existing AWS cloud resources into the Terraform state file and manage them via Terraform in the future. This approach is automated, fast, reliable, auditable, and maintains business continuity.
In this note, I’ll show you how to import AWS cloud resources into the Terraform state file using GitHub Actions. Previously, terraform import was only available as a CLI command with limited workflow integration. You may read about that at what-is-terraform-import-and-why-you-too-should-know-about-it. With Terraform 1.5+, declarative import blocks provide an idempotent and reviewable approach that aligns with Infrastructure as Code best practices.
In this use case, I considered importing an AWS Virtual Private Cloud that was manually created into a Terraform state file to demonstrate the modern declarative import workflow using GitHub Actions. This approach illustrates how teams can seamlessly migrate existing infrastructure to Infrastructure as Code while maintaining automated CI/CD practices and proper code review processes.
Prerequisites:
– AWS account with manually provisioned VPC, subnets, and route tables
– Access to the AWS account for GitHub Actions to import resources
– Amazon S3 bucket to store the state file
– GitHub repository with OIDC configured for AWS authentication
– IAM role with appropriate permissions for resource import
This use case is split into the following high-level steps:
1. Create a GitHub repository with the Terraform configuration
2. Add provider and backend Terraform configuration
3. Create GitHub Actions pipeline
4. Identify AWS cloud resources to import into the Terraform state file
5. Create Terraform code for the AWS cloud resources
6. Add import blocks to the Terraform configuration
7. Trigger terraform plan via GitHub Actions
8. Review terraform plan output
9. Create GitHub Pull Request
10. Merge code and deploy via GitHub Actions
11. (Optionally) Verify the import
The code for this use case is in the GitHub repo: LearnTerraform. Folder: terraform-import-aws-resource. Now, let’s start with the implementation.
Step 1: Create a GitHub repository with the Terraform configuration
Create a new GitHub repository to host the Terraform configuration files. Once created, switch to a feature branch (e.g., feature/import-vpc) instead of working directly on the main branch. This approach ensures proper code review and prevents accidental deployments, since the GitHub Actions workflow must only execute terraform apply on the main branch.
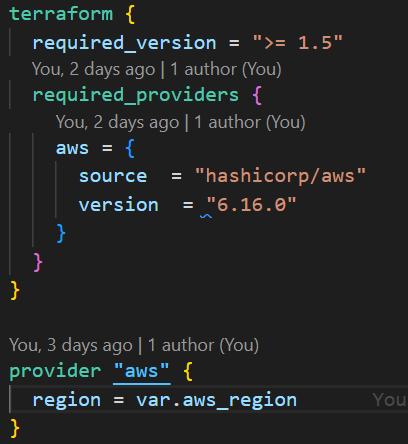
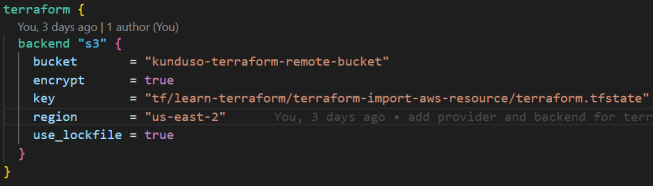
Step 2: Add provider and backend Terraform configuration
In the feature branch, create a provider.tf file with the Terraform configuration. Set the minimum version to 1.5+ (required for import blocks) and pin the AWS provider version for stability.
Configure the S3 backend to store the state file. Only the S3 bucket needs to exist beforehand – Terraform will create the state file automatically.
Step 3: Create GitHub Actions pipeline
Create a GitHub actions workflow .github/workflows/terraform.yml in the repository to automate Terraform operations. Configure the workflow to run terraform plan on all branches but restrict terraform apply to only run on the main branch.

This conditional deployment ensures that feature branch changes are validated without being applied to your AWS infrastructure.
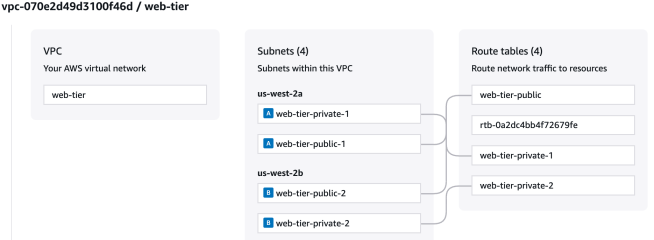
Step 4: Identify AWS cloud resources to import into the Terraform state file
List the existing AWS resources you want to import by collecting their IDs and configurations. Use the AWS Console or CLI to gather resource details:
– VPC ID (e.g., vpc-12345678)
– Subnet IDs and their configurations
– Route table IDs and associated routes
For this example, I imported a VPC, two subnets, and their associated route tables. I listed these resource IDs through the AWS Console and AWS CLI as I needed them for the import blocks in Step 6.
Step 5: Create Terraform code for the AWS cloud resources
Add Terraform resource blocks that match the configuration of the existing AWS resources. The attributes must exactly match the current state of the resources to avoid configuration drift.
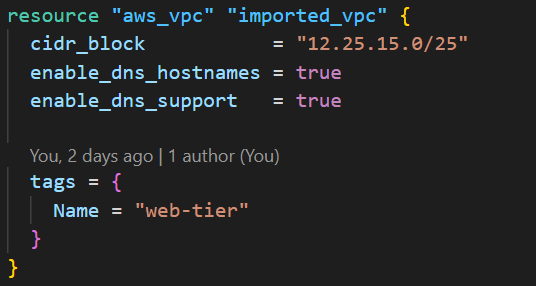
Ensure the resource names (e.g., aws_vpc.imported_vpc) are descriptive, as you’ll reference them in the import blocks in the next step.
Step 6: Add import blocks to the Terraform configuration
Add import blocks to the Terraform configuration to link existing AWS resources to it. The to parameter references the resource block from Step 5, and the id parameter uses the actual resource ID from Step 4. As shown in the image below, I needed the Amazon VPC ID to import the resource into the Terraform state file.

Repeat this process for each resource you want to import (VPC, subnets, route tables, etc.).

Step 7: Trigger terraform plan via GitHub Actions
Commit and push your changes to the feature branch. This action automatically triggers the GitHub Actions workflow, which runs terraform plan to validate your import configuration and show what changes Terraform will make. The workflow will run terraform plan but skip terraform apply since you’re not on the main branch, allowing you to validate the import process safely.
Step 8: Review terraform plan output
Check the GitHub Actions workflow results to review the terraform plan output. Navigate to the “Actions” tab in your repository, then click the latest workflow run to view the logs.
Look for output indicating that Terraform will import the existing resources:
– Resources marked for import (not creation or destruction)
– No unexpected changes to existing infrastructure
– Successful validation of resource configurations
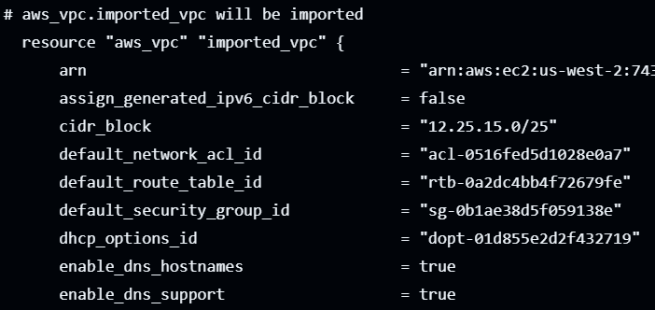
The image below shows that the aws_vpc.imported_vpc will be imported into the state file without any changes (~).
If the plan shows errors or unexpected changes, review your resource configurations in Steps 5 and 6 to ensure they match the existing AWS resources exactly. Once you have all the import blocks correctly configured, check the final output from the terraform plan command. It must list all the resources to import.
It is preferable to have all resources under import and nothing under add, change, and destroy, since this implies that the resources will be imported without any change in property. Iterate through this step by updating the Terraform configuration with the state of the resource, such that you do not see any resources under add, change, and destroy.
![]()
However, please understand that this is not a hard rule. There are situations in which resource properties change during the import process. Please ensure that the team reviews the code and reaches consensus on the approach.
Step 9: Create GitHub Pull Request
Once the terraform plan output in the previous step looks correct, create a pull request to merge your feature branch into main. This code-merge activity allows for code review and discussion before the actual import is executed via terraform apply.
You can view an example pull request from this use case here: learn-terraform-pull-request-7.
Step 10: Merge code and deploy via GitHub Actions
After the pull request is reviewed and approved, merge it into the main branch. The merge to main branch automatically triggers the GitHub Actions workflow, which now executes terraform apply since the code is on the main branch.
![]()
The workflow will import the existing AWS resources into the Terraform state file. Monitor the GitHub Actions logs to confirm the import process completes successfully and the resources are now under Terraform management.
Step 11: Verify the import
To confirm the import was successful, check your S3 bucket where the state file is stored. The state file now contains your imported AWS resources and their current configuration.
That brings us to the end of this note. You learned how, by using Terraform 1.5+ declarative import blocks with GitHub Actions, you can successfully transition existing AWS infrastructure into Infrastructure as Code management without service disruption.
This approach provides some key advantages over option A. These are:
Zero downtime: Resources remain operational throughout the import process
Automated validation: GitHub Actions ensures configuration accuracy before deployment
Code review workflow: Pull requests enable team collaboration and change approval
Audit trail: All infrastructure changes are tracked in version control
After a successful import, the AWS resources are fully managed by Terraform, enabling consistent deployments, configuration drift detection, and collaborative infrastructure management.
