
When project teams host an application or service on an Amazon EC2 instance, they have specific questions about the underlying infrastructure. A few of them could be:
(a) Can the project team be assured that if some or all existing EC2 instances were terminated or unresponsive, new Amazon EC2 instances (with the application hosted) would be auto-created?
(b) Can the number of Amazon EC2 instances scale based on metrics like CPU? Add more instances when the load is high and decrease them when it is low. Click here to read.
(c) Can the project team implement a zero downtime deployment of the application hosted on Amazon EC2 instances? Click here to read.
Amazon EC2 Auto Scaling group is the answer to the use cases above. Per AWS-Docs, an Auto Scaling group contains a collection of EC2 instances that are treated as a logical grouping for the purposes of automatic scaling and management. An Auto Scaling group also lets you use Amazon EC2 Auto Scaling features such as health check replacements and scaling policies.
In the following paragraphs, I explain creating an Amazon EC2 Auto Scaling group with Terraform. Toward the end, I also have a link to an article demonstrating how to automate the process using GitHub Actions.
In my previous note, I described how to host a few EC2 instances in a private subnet and attach them to an application load balancer in a public subnet. Compared to that stack, everything remains the same except for the EC2 instances that I replaced with an Amazon EC2 Auto Scaling group and the load balancer attachment. I have the code committed to my GitHub repository: add-asg-elb-terraform, and you can follow along if you are interested.
Creating an Amazon EC2 Auto Scaling group involves creating two resource types in Terraform. They are the aws_launch_template and the aws_autoscaling_group. However, at a higher level, this use case has four essential infrastructure components. These are:
1. Create the network stack
2. Create the launch template
3. Create the autoscaling group from the launch template
4. Create the load balancer’s target group and attach it to the autoscaling group
Let us thoroughly explore these infrastructure components, beginning with the network stack.
1. Create the network stack
I created the Amazon EC2 Auto Scaling group in the private subnet spread over three availability zones in a VPC. If you want to learn about that networking stack hosting the Amazon EC2 Auto Scaling group, head to this note and focus on section –1. Create the network stack section.
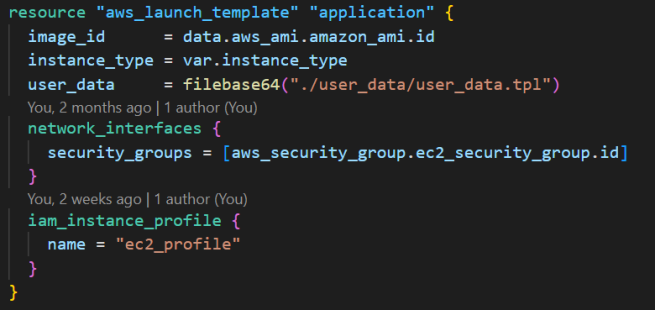
2. Create the launch template
The launch template contains the meta-data of the Amazon EC2 Auto Scaling group, like the AMI image id, the instance type to host the AMI, the user data script to run after provisioning the EC2 instance, etc. Head to the official Terraform registry page for an updated list of all the supported properties. As you can see from the image below, in my code, I provided the details with a few additional information, like the security group to attach with the EC2 instances and the IAM profile to attach with the EC2 instances. Attaching the IAM instance profile is optional.
3. Create the autoscaling group from the launch template
The Amazon EC2 Auto Scaling group creates Amazon EC2 instances from the launch template configurations. It does this by referencing the launch template ID and version to use, the number of instances to create, the subnet to host the Amazon EC2 instances, etc. Please refer to the official Terraform registry page for a detailed note on these options.
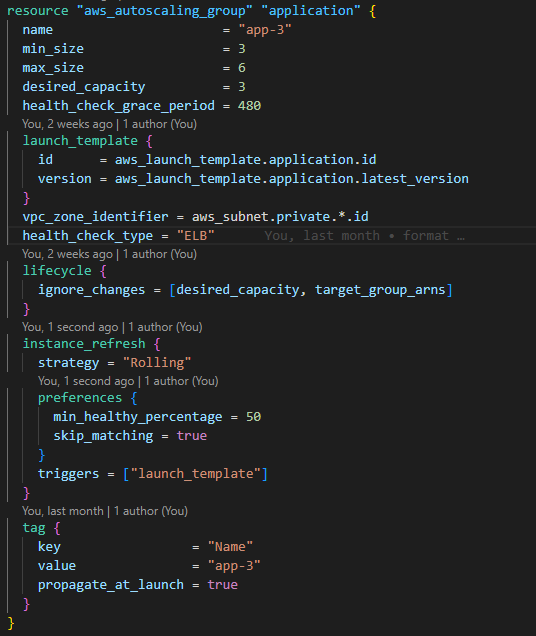
There are additional values like the lifecycle ignore_changes and the instance_refresh configuration values. The lifecycle block specifies that the autoscaling group should not scale down the instances if a scale-out activity is in effect while redeploying. Similarly, the instance_refresh property ensures that newer instances are rolled out when a more recent version of the launch_template is available.
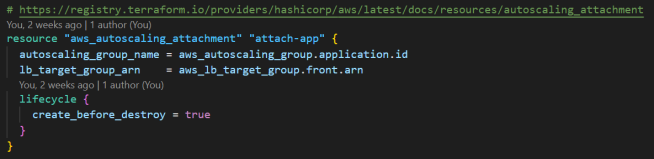
4. Create the load balancer’s target group and attach it to the autoscaling group
I borrowed from section 3. Create the application load balancer of my note -attach-an-application-load-balancer-to-amazon-ec2-instances-in-a-private-subnet. The only difference is that the resource type is aws_autoscaling_attachment.
I also automated the provisioning of the AWS resources using GitHub Actions. If you want to learn how I managed the authentication process, head over to this note –securely-integrate-aws-credentials-with-github-actions-using-openid-connect.
I also scanned my code for vulnerabilities using Bridgecrew Checkov, which generated a scan report. Here is a note on how to enable Checkov with GitHub Actions. I’m also interested in the cost of these resources and use Infracost for that, which I have covered in detail in this note –estimate AWS resource cost.
Once I had added all the resources and their configurations to my Terraform code, I pushed the changes to my remote repository and created a pull request (open link). Since I had the Checkov and Infracost integrations, I learned about the coding violation and the cost of the infrastructure stack in the pull request. Here is a link to the pull request comment for Infracost (open link) and the coding violations report (open link).
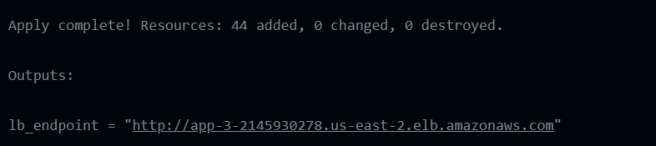
After I merged the pull request into the main branch, the GitHub Actions workflow started with the command terraform apply enabled. At the end of a successful GitHub Actions automation, the output was in the logs:
On the AWS Console, I navigated to EC2 -> Instances -> Launch Templates and found that Terraform created the launch template with the desired specifications.

And the same for the Auto Scaling Group (EC2 -> Auto Scaling -> Auto Scaling Groups).

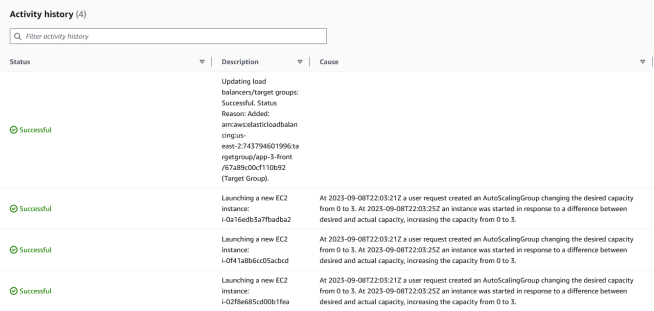
Then, I selected the Auto Scaling group, navigated under the Activity tab, and reviewed the Amazon EC2 instances creation and addition process to the load balancer’s target group.
And finally, when I navigated to EC2 -> Instances -> Instances, I saw the three Amazon EC2 instances.

I pasted the GitHub Actions output on a browser, and at each refresh, there was a “Hello World” message from a different EC2 instance. Below is an example of one of them.

At this point, you might have a question –How different is this Auto Scaling group setup compared to hosting the Amazon EC2 setup I previously had? To understand that, terminate one of the EC2 instances from the AWS Console (select any EC2 -> Instance state -> Terminate instance). After a few seconds, when you refresh the URL, you will notice that the link hovers between the two active EC2 instances (instead of the three earlier).
If you navigate the Auto Scaling group page, you will notice some activity similar to the one below.

Similarly, in the EC2 Instances section, you’ll notice that a new EC2 is initialized in the same availability zone as the previous (terminated) instance.

After a few minutes, you’ll notice that the new Amazon EC2 instance is part of the Load Balancer’s target group ( check EC2 ->Load Balancing -> Target Groups).
And on each URL refresh, the new instance’s webpage is added to the existing two. So, that is how hosting an application in an Auto Scaling group differs from hosting it on an Amazon EC2 instance. We observed this behavior because the desired_capacity of the autoscaling group is set to 3 (check the code repository). When we terminated one instance, the autoscaling group came into effect and not only created a new instance but also added that to the load balancer’s target group. Once the EC2 instance started reporting healthy, the load balancer also started routing traffic to that instance.
At the beginning of this note, I mentioned three use cases; in this note, I addressed the first one and added the links to the other two notes next to them.
So, that is how I created an Amazon EC2 Auto Scaling group and attached that to an application load balancer. Let me know if you have any questions.
NOTE:
This note is part of a series I wrote on Amazon EC2 instances. Read along if you are interested in learning more.
In my first note, I demonstrated how to host an application in one EC2 instance. However, the challenge was that the application would no longer be available if the EC2 instance were terminated (manually or otherwise).
That leads me to identify how to attach a load balancer to multiple EC2 instances so that the user is not impacted if a server goes down and the load is evenly distributed across all the EC2 instances. However, I had the EC2 instances hosted in a public subnet (with a route to the internet). I then tightened up the architecture and moved the EC2 instances into a private subnet (no route to the internet via the internet gateway). Although the architecture is better than the previous ones, there is no way to manage the EC2 instances if one or all went down or were inaccessible. We covered that in this note when we hosted our application on Amazon EC2 Auto Scaling group.

Hello Sourav, thank you very much for publishing very useful real time use cases. One thing I would like ask about diagrams. Please advise, which tool are you using to create these nice images. thanks & regards, Narayan
LikeLike
Thanks, Narayan, for your comment. I use the icons from the AWS Architecture Icons slide deck to build up the feature image on PowerPoint and take a screenshot of that. You can get them at https://aws.amazon.com/architecture/icons/.
LikeLike