In the past, I’ve written a note explaining the process of deploying the Terraform IaC configuration into an AWS account using GitHub Actions. In this note, I extend that functionality and deploy the same Terraform IaC configuration across multiple AWS accounts using Terragrunt and GitHub Actions.
Before we delve deeper, let me briefly explain the four essential terms in the title of this note that we must understand -AWS accounts, Terraform, Terragrunt, and GitHub Actions. Per AWS-Docs, an AWS account is the basic container for all the AWS resources you create as an AWS customer. Terraform is a popular, easy-to-understand, and learn infrastructure-as-code tool that has accelerated the adoption of IaC principles. Terragrunt is a thin wrapper around Terraform that extends a few capabilities, primarily the ability to deploy Terraform configuration across multiple AWS accounts. And finally, GitHub Actions is an automation tool that makes it easy to carry out such activities -manage authentication with AWS, deploy Terraform configuration, and manage environments.
With Terraform, a project team manages its HCL code to provision resources and a set of commands to apply the HCL code to a specific AWS Account. In a very short period, developers learn to write HCL code to build and deploy the infrastructure. Terraform enables that via a few mandatory blocks of HCL code. These are required_provider, provider, and backend. The backend block stores the path to the terraform state file. It is optional but essential if the code is managed by multiple IaC engineers or automated via a CI-CD pipeline.
Here is an example code in the backend code block for the AWS Terraform provider.
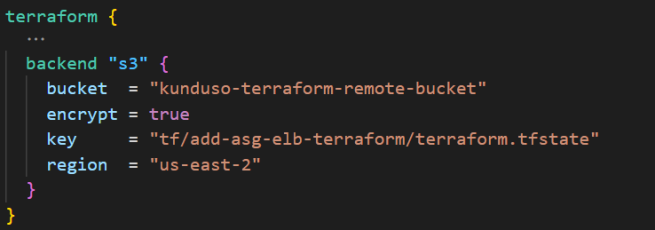
As you can see, the backend block stores three critical pieces of information -the S3 bucket, the key to the .tfstate file, and the region of the S3 bucket.
Challenge:
Generally, when a project team works on an application, they want multiple environments to test it -Dev (short for development), Test, Prod (short for production), etc. And a project team would prefer as much environmental isolation as possible. One technique to isolate the environment is through separate AWS accounts. And Terraform can be used to provision infrastructure across individual AWS accounts. But when it comes to creating the infrastructure for these environments in the individual AWS accounts, there are two considerations:
(a) the code in the Terraform backend block cannot have variables, and
(b) the bucket names are unique across all the AWS accounts.
If variables were allowed in the backend code for the S3 bucket, key, and region, we could set that to separate values for separate AWS accounts. Similarly, if the bucket names were not unique across AWS accounts, we could have had the same name across different AWS accounts, and there would be no conflict. And hence, using Terraform to deploy the same code without repeating it across separate AWS accounts becomes challenging.
Solution:
A solution to extending the usage of Terraform code across different AWS accounts is to generate the backend block dynamically at runtime. An IaC engineer can pass variables and develop the Terraform code to work across separate AWS accounts by generating the backend block at runtime. And that is one of the use cases that Terragrunt addresses. Using Terragrunt, IaC engineers can use the same Terraform configuration across multiple AWS accounts without repeating the code. Terragrunt can also be used in a CI-CD pipeline.
In this note, I demonstrate how to use Terragrunt to deploy the same Terraform configuration code (with environment-specific configurations) across two separate AWS accounts using GitHub Actions. The process can be classified into three high-level steps. These are:
1. Create the pre-requisites in AWS and GitHub Actions,
2. Add the environment-specific Terragrunt HCL code to the GitHub repository, and
3. Run the HCL code via GitHub Actions.
Before I start explaining the workflow, there are a few essential concepts regarding Terragrunt that I want to mention. These are as follows.
include{} -all the HCL files relevant to an environment
inputs{} – the environment-specific values of the infrastructure
terraform{} -the path to the terraform code where the .tf files are stored, and
remote_state{} -the S3 bucket, the key, and the region to store the terraform configuration. An exciting feature is that Terragrunt will create the S3 bucket if it does not exist. Same for the Amazon Dynamodb table.
It is best to review these concepts via a working example. Check out my GitHub repository: add-aws-elb-ec2-private-subnet-terraform-live, where I have functional code.
GitHub Repository Layout:
There are two top-level folders – .github folder to store the pipeline workflow YAML files and the environment folder to store the environment-specific (dev and test) HCL configuration. I could have had another folder in the GitHub repository as infrastructure and kept the terraform code (.tf files) in the same repository; I do not have it that way. Instead, I am (partially) following the recommendations made in the article –infrastructure-live for Terragrunt, where the Terraform code is stored independently of the Terragrunt configuration.
AWS Account Layout:
I have two separate AWS accounts for each Dev and Test environment. I have an Automation AWS account (DevOps) that hosts a role (role/devops-automation) to manage the deployments to the two AWS accounts.
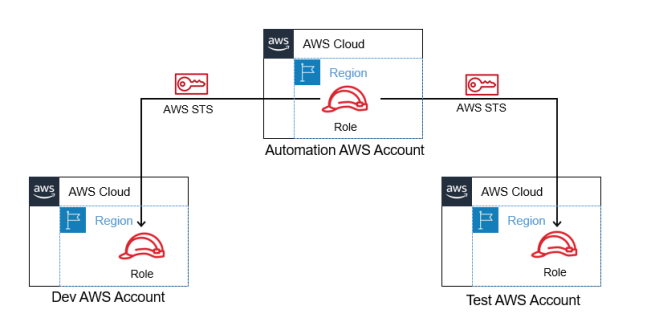
1. Create the pre-requisites in AWS and GitHub Actions
Since I follow the setup above -a central automation account and two separate accounts for each environment- there are a few prerequisites to arrange before I can let the GitHub Actions automation run. These are:
(a) Configure OpenID Connect in the Automation AWS account to authenticate with GitHub actions,
(b) Create a role with appropriate permissions in the target AWS account (Dev and Test),
(c) Set up a trust relation between the AWS IAM roles (automation account and dev account roles and automation account and test account roles), and
(d) Create Environments in GitHub for each product environment.
Let me now expand on each of these steps, starting with:
(a) Configure OpenID Connect in the Automation AWS account
I use OpenID Connect to authenticate the GitHub Actions workflow and store the ARN of the role as a GitHub secret. If you are new to OpenID Connect and want to learn how to set that up, head over to –securely-integrate-aws-credentials-with-github-actions-using-openid-connect. In a short span, you will be able to set that up yourself. I captured the trust relationship of the role in the below image. Your IAM role’s trusted entities must look similar except for the AWS account number and the GitHub repository name.
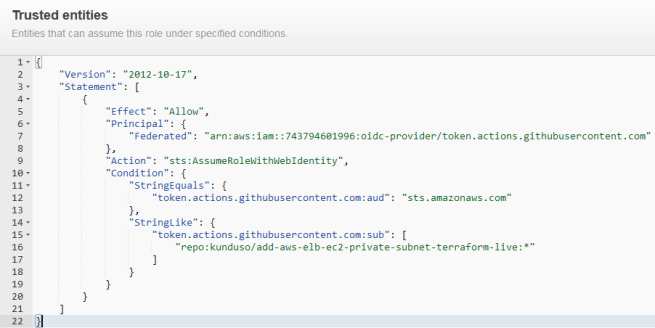
Then, I use the below code in GitHub Actions to configure the credentials. The value of role-to-assume is the ARN of the role that I stored as a GitHub secret.

(b) Create a role with appropriate permissions in the target (Dev and Test) AWS accounts
In each AWS account (Dev and Test), create an IAM role with a permissions policy and a trust relationship with the Automation AWS account. I am not going into the details of how to create a role, but at a high level, when you launch IAM -> Roles -> Create Role and select the Trusted entity type as AWS account and select “Another AWS account,” and copy the AWS account number of the automation AWS account. After that, choose a permission policy that supports the Terraform configurations in the project. Select or create a reasonably tight permissions policy or go with the AWS-managed AdministratorAccess, which I would not encourage due to security concerns. After creating the role, edit the trusted entities and tighten that up.
When you create the role via the AWS console, the trusted entities will look like below:
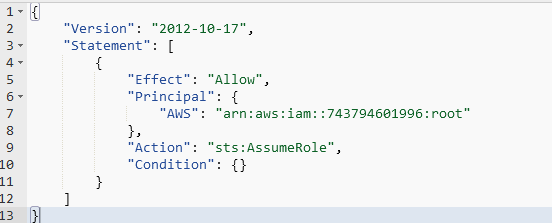
Change that to:
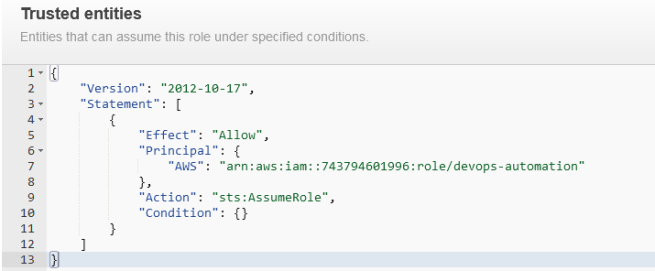
Please ensure you have the correct AWS account number and the role name.
As you can see, the updated trusted entity is tighter than the previous one since it enables sts:AssumeRole to only the role/devops-automation entity in the specified AWS account.
After creating the Dev AWS account role, I repeated the above step for the Test AWS account.
(c) Set up a trust relation between the AWS IAM roles
I completed half of the trust set up in the previous step. In this step, I enabled the role created in (a) to assume the roles in the Dev and Test AWS accounts. This is what the permission policy of the devops-automation role in the Automation AWS Account looked like at the end:
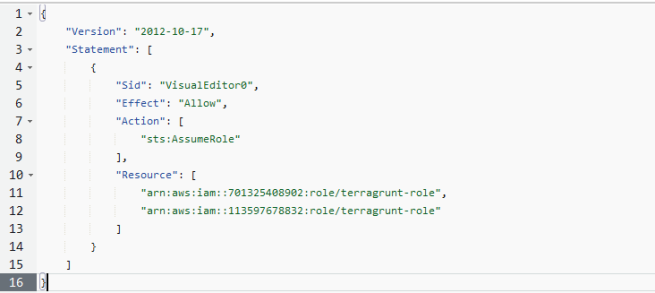
That is all required to set up the trust relationship. For the next step, head over to GitHub.
(d) Create Environments in GitHub for each product environment
On your GitHub repository page, navigate to the Settings Tab at the top. Then, search for Secrets and variables on the left-hand vertical pane, open the menu, and select Actions.
Following the first step under (a), you would already have a repository secret with the IAM_ROLE name and secret value. There is also a provision to manage Environments here. Click on Manage environments -> New environment -> Name it as “Development” -> Configure environment.
Please create a new environment secret as ACCOUNTNUMBER and store the AWS account number as its value. Repeat the same for the Test AWS accounts. I also stored the value of AWS_REGION as an environment variable.
Please note: The name you give to an environment here must map with the terragrunt.yml file in the .github\workflow folder.
And that brings us to the end of all setup-related activities. Next, I will show how to create the configuration for each environment.
2. Add the environment-specific Terragrunt HCL code to the GitHub repository
Navigate to the environments folder in the GitHub repository. You will see that I have two top-level folders in the “environment” folder: dev and test, corresponding to the two environments. I have a region-specified folder inside these folders with the terragrunt.hcl file for each environment. There are three Terragrunt constructs used in the file which I discussed above –include{}, terraform{}, and inputs{}. For all the standard code across all the environments, I stored them in the common.hcl, which is at the root of the repository.
The common.hcl declares how to generate the provider and the remote_state to store the state file. You will also see that I specified the bucket as terraform-remote-state-${get_aws_account_id()}, which would be a unique bucket for each environment since the account number is unique per AWS account. Also, using the repository name and the path_relative_to_include() Terragrunt function enables us to maintain a unique path to the state file. This approach is beneficial if multiple GitHub repositories deploy to the same AWS account.
3. Run the HCL code via GitHub Actions
Finally, we’re at the last section, which is to provision infrastructure for a specific environment. The code to deploy the Terraform configuration is in the .github\workflows folder. Since deploying to multiple environments is the same, I am utilizing a reusable workflow. You can read about that at –using-reusable-workflows-github-actions. In my code, the deployment to the Dev and Test environment is one after the other, provided the previous deployment passed, and the gate was approved. The sequencing of deployment (one after the other) is managed using the needs keyword in the jobs code block, and the reusable workflow is managed via the uses keyword. Also, how is Terragrunt deploying the code to a specific AWS account? That is managed via the --terragrunt-iam-role for each terragrunt command in the deploy.yml workflow file. The role points to an IAM role ARN with a variable, the ACCOUNTNUMBER, and if you remember, we added that to the GitHub environment secret. And the environment is selected in the terragrunt.yml jobs that call the deploy.yml workflow.
Here is a link to a GitHub Actions workflow that deployed the Terraform configuration successfully to the Dev and Test environments.
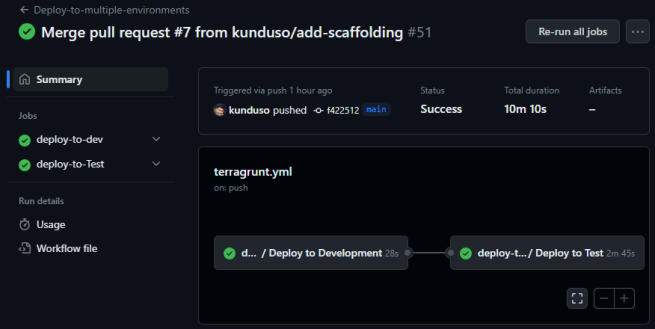
As you can see from the GitHub Actions run, it was deployed to the Dev and Test AWS accounts. If you navigate the environment folder in the GitHub repository, you will see that the two environments have different Terraform resource values. Below is an image of the terragrunt.hcl file in the environment\dev\us-east-2\infra folder.

The configuration values are different if you compare that against the code in the Terraform source repository. Similarly, take a look at the terragrunt.hcl file in the environment\test\us-east-1\infra folder below:

The values are different from the dev version. You can also see that I added additional values (availability_zone and instance_type). This approach demonstrates that by using Terragrunt, I could manage separate environment configurations without repeating all the Terraform code.
And that brings us to the end of this note. Using Terragrunt, we can use the same Terraform code with separate variable values for separate environments hosted in separate AWS accounts. And the process is automated using GitHub Actions. Here are some additional concepts we explored:
-configure OpenID Connect with AWS and manage GitHub Actions deployment into AWS without storing secure credentials
-create a trust relationship between AWS accounts using roles
-create environments in GitHub to store secrets securely
-add environment-specific Terragrunt HCL code
-run the Terraform code with separate values for separate environments
-work with reusable workflow in GitHub Actions
-protect deployments to upper environments using approval gates
This note and the GitHub repository have everything you need to start working with Terragrunt. So please go ahead and fork the repository and start creating your deployment. If you have any questions, please do not hesitate to contact me. Same for suggestions as well.
